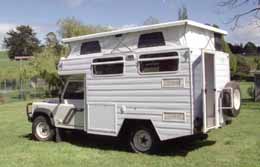
Driving:
- Šnek
can sleep 3 persons (on beds!)
- 4 persons can travel
in it (there
are safety belts in the rear). Unfortunately, people in the rear are
not very uncomfortable for driving and there is almost no view outside
- seats are too high to see forward and rear side windows are quite
small.
- there is no provision
for child seat
- drivers cabin
ergonomics - it is Land Rover Defender (see discusion of Defender's ergonomics on internet...)
- reversing - preferably
co-driver
should help, especially if there is any possibility of children or
other
vehicles in vicinity. Video camera above rear doors and small round
mirrors help
a lot but still...
- it is very easy to
underestimate height of body (~2450 mm closed down and hit a
tree branch, road sign or low roof of house/shop
- Šnek is 5650mm
long - too much
for a standard parking space. Unless two in line are available,
parallel
parking may be the only option (or reverse into the parking space, if
there
is lawn or flower bed behind it)
- Šnek is 2130mm
wide, which makes
trips on forest tracks difficult. If track is uneven, sway of body may
add
another half a meter each side, resulting in overall requirement of
well
over three meters. If there are low branches there may be a problem
even
if road itself is wide enough
- Weights at weighbridge during return from Perth
(January 2003): front axis 1500 kg, rear axis 1980 kg total 3480 kg
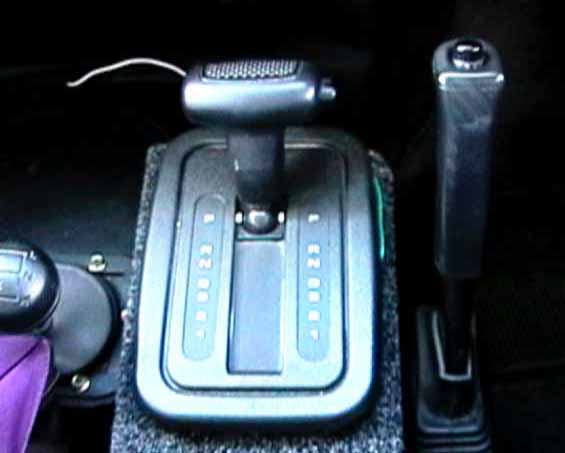
- engine braking
makes for more
relaxed descents, manual downshift to 3 or 2 may be needed before there
is
any appreciable response (watch engine revs!).
- hand brake is
acting on transmission, not on wheels -
- it should not be
used while driving (it is parking brake only)
- it is useless if
one wheel is
jacked up (unless differential lock is on)
- it shows slack in
gears - when
applied and foot brake is released, car may roll a few centimeters -
that
is normal and cannot be eliminated by stronger force on brake lever
- hand brake on
this vehicle is
very efficient and there is no need to apply excessive force
- car must not be
ever driven
on non-slippery surface with differential lock ON
- the rule is: small
gearstick
has to be on the right side (close to T-bar) on hard surface
- serious damage
to drivetrain is possible if the vehicle is driven with differential lock ON on hard
surface (the same applies to most 4x4s)
- to adjust external
mirrors hex
("Allen") 4mm key is needed .They were treated by superglue as they
refused to stay put at speed - please do not attempt adjustment if at
all
possible
- speedo has +error
of almost 10 kmh
(a bit more over 100, less around 60), eg if speedo is showing 90 you
are doing 80
- best solution is to
use GPS navigator as a speedo, they are usually perfectly accurate
- vehicle seems to be
struggling
when starting and very slow speed driving over soft / uneven surface -
change to Low gearing makes it idle over almost
anything. Change Lo
to Hi and vice versa while auto is in N, manual brake off and footbrake
on.
- close windows if
driving in
mud - front wheels aim for the opening :-)
- Power steering:
the correct level of fluid is (surprisingly) between bottom mark and
tip of
the stick (see user manual for details)!
- You can expect
12-13 l
/ 100 km
both on freeway and on dirt roads.
- You can expect
maximum speed
of ~ 115 km/h on level road if there is no unfavourable wind, but it
can drop to 80 km/h with strong headwind.
- driving off
blacktop
- check, that you are
allowed to drive where you point the vehicle - off-road is prohibited
in most places and tracks may be private or closed or require permit (aboriginal areas).
- "No alcohol in
vehicle" rule applies in some aboriginal areas and penalties are
draconian.
- Check, if you have
enough fuel for the trip - plus reserve! - and where you will be able
to get it again.
- Šnek inherited
off-road ability of LandRover Defender but it is compomised by its
body, its size, its weight and to some degree by its automatic gearbox.
Do not expect that the road where Landrcrusier went provides sufficient
profile for Šnek. Do not
expect that any other 4x4 - almost certainly smaller - wold be able to
pull you out of bog. Self recovery may be difficult - there is no
provision for Hi-Lift Jack, Exhaust Jacks cannot be used and while
there is electric winch in bullbar there is no way how to effciently
pull back (or to the side). Reversing or turning on narrow difficult
track would be nightmare or impossible.
- Sensible approach
is to drive Šnek
on tracks where you would probably get through in 2x4 and treat its off-road ability as no more than
self-recovery option.
- engine should
idle for at
least 10 sec before it is switched off (otherwise turbo may be
still
turning but its bearings are no longer lubricated)
|
 |
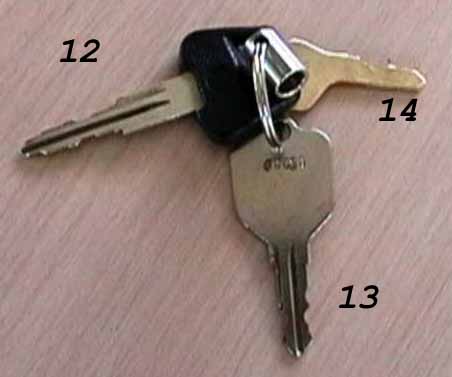
List of keys:
- "driver's key
ring"
- ignition key [12]
- front door / fuel
filler [13]
- back door
(golden
with blue mark)[14] (different key nowadays)
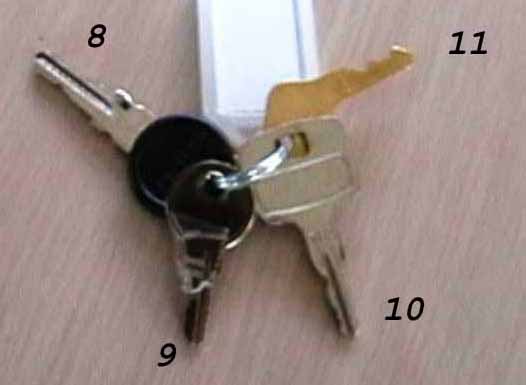
- "appliances"
- RS storage
compartment [11]
- CC compartment
and gas bottle
compartment [8]
- hot water [9]
- water filler cap
[10] (different key
nowadays)
- key for towbar
(not on this
photo)
|
 |
Petrol station chores:
- diesel only, never
petrol
- if petrol gets in the tank
by
mistake, it has
to be removed and refilled, even petrol diluted with diesel can seriously damage the engine
- before driving in:
- hot water system
has to be switched off
- diesel heater has
to be switched
off
- fuel cap uses the
same key as
cabin doors [13]
- it is a slow
process, best approach is
- avoid automatic
switching by
turning outlet 90-180 deg
- fill slowly
- keep small pool
of diesel in
inlet
- it helps if
- there is slope
away from diesel inlet
- drivers doors
are closed
- left side doors
are open
- other person
sits in the left
side door
- Motor oil - Shell
oil for diesel
engines (black bottle) is in the external compartment
|
|
Fuel consumption:
- 12-13 l / 100 for
standard conditions -
- either sealed
road 90-100 km/h
- or unsealed (not
too bad) at
50-80 km/h
- that equals for
fuel tank gauge
from the right (approxiamtely) -
- first division
150 km
- second division
150 km
- third division
100 km
- last (red)
division 250 km (most
likely with very small reserve)
- altogether some
650 km blacktop
or dirt...
|
|
Before departure:
- Disconnect 240V
- Unplug power cord
from C/Pk
power point
- unplug power cord
from socket
on RS of Šnek
- coil power cord
and store (in
outside compartment on LS if desired)
- Water system
- switch off heater
(if on)
- switch off pump
- switch off flushing
of chemical toilet
- Fridge
- check that it is locked in
the inside position
- Close poptop
- open rear (or any
other) door to let
air out
- open shower door
- hang on both
handles in the
middle of ceiling until roof is in mid-stroke position (it is a stable
position and the roof will not move up or down)
- check if vinyl
skirt folded
inside and if not, pull it in by hand
- check the vinyl
skirt inside
CC cubicle too
- continue closing
until the roof
drops down
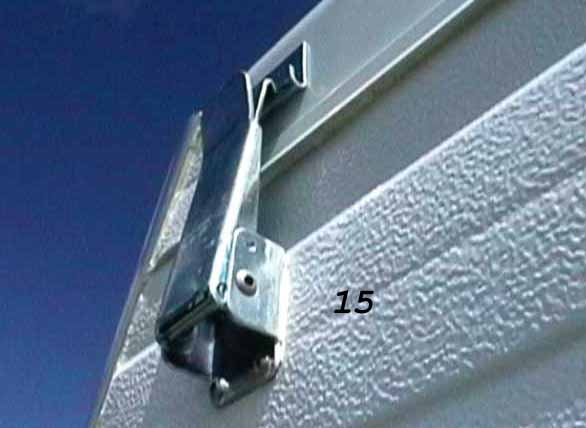
- lock four latches [15]
outside otherwise poptop will open at about
80 km/h (do not ask how we know...)
- short stick with rubber
cap ("marshall's stick") may be used if latches are difficult to reach
- close shower door
- close rear door
if desired
- Close rear doors
- remove curtains
from rear doors
to provide better view to driver
- check that all
windows are closed
- put outside step
- if used - under the fridge
- close door
- lock
|
 |
Short term parking
- Junk food can be
unobtrusively
consumed with poptop down with just a little inconvenience
|
|
Swing windows:
- Note: Take
care - window
winders have smallish plastic gears only
- to open window
- fully unlock both
shifting locks
[24]
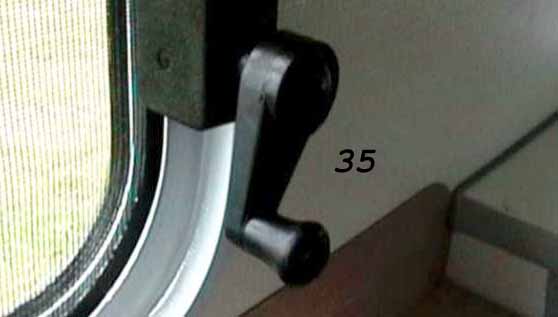
- wind open using
handle [35]
- swing windows
tend to stick to
rubber seal, when this happens push carefully outside to break the
adhesion
- to close window
- wind down using
handle [35]
- do not over
tighten (see note
above)
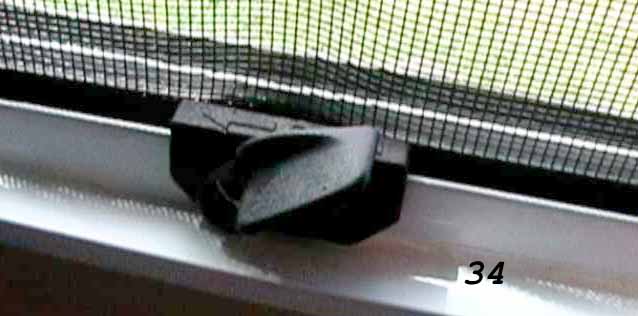
- fully lock both
shifting locks
until they click [34]
|
 |
Sunroof games:
- to partly open -
- unlock handle and
push up
- to close - use
red button on
handle
- to remove
completely (a brainteaser)
- remove
- unlock handle
by pushing two
toggles together
- flip small flap
on each hinge
down from front edge
- pull down and
back
- install back
- insert hinges
back pushing up
and forward
- lock flaps back
- align handle
end and engage
toggles
|
|
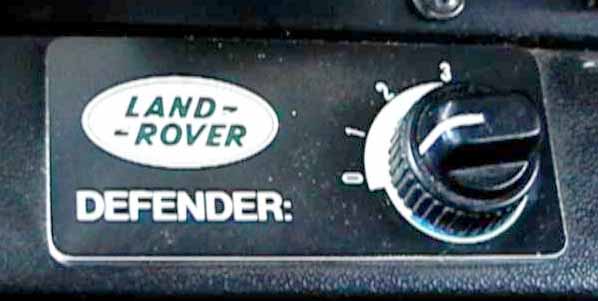
Aircon:
- it is controlled
from small panel
under steering wheel
- it is probably dead
by now - we hardly ever used it
|
 |
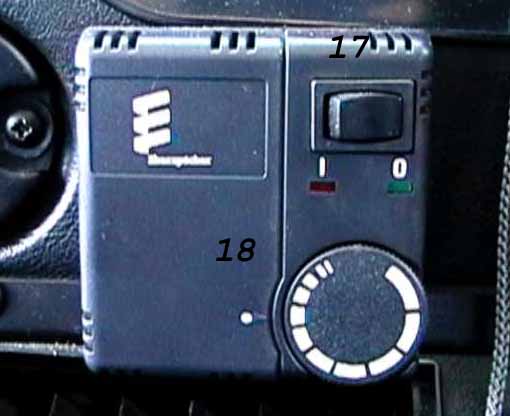
Diesel heater:
- it is installed
under driver's
seat
- it is controlled
from panel
on dashboard
- to operate
- remove piece of rag (code
name "mouse") from
combustion air inlet under car in driver seat area: it is used to
eliminate
entry of mud into heater when off road
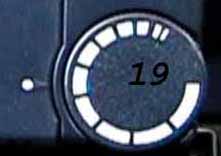
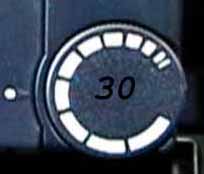
- set desired
temperature range
by turning dial
- very low [18]
- probably under
20 deg [19]
- warm [30]
- (or any other
desired position...)
- these settings
are not accurate,
actual temperature depends on number of factors
- flip switch [17]
ON
- wait, heater goes
through -
- number of self
checking phases
- automatic
ignition sequence
- a few minutes
long measuring
phase, when it is running on full
- after
properties of environment
were established, heater will limit its heat output (minimum output is
800
W).
- if minimum
output still creates
excessive temperature, heater will automatically cycle on/off (with
setting
[18] heater carefully cycled to maintain 15 deg during our trip to
Tassie)
- to switch off
flip switch [17]
OFF
- flame is
extinguished instantly
but heater will run for a few more minutes to cool itself down
- heater is using
diesel from
the main vehicle tank
|
  |
After arrival:
- Raise poptop if desired
- unlock four
latches outside
- open any door to
let air in
- push by both
forearms against
ceiling between both handles in the middle of ceiling until roof lifts
- close door if
desired
- Connect 240V if desired &
available
- get power cord
(most likely from
outside compartment on LS if desired)
- plug power cord
to socket on
RS of Šnek
- connect plug to
C/Pk power
point
- Water system
- switch on pump if
required
- switch on heater
(if hot water
is needed); the pump must be ON
- mixing of water
in shower area
is as usual difficult. It is easier to go for shower approx. 10 - 20
min after
heater is switched on. Water is lukewarm only and does not need much
mixing
if at all
- rubbish bin
on the compartment
door can be rermoved and lid lifted for showering
- keep on mind,
that gray water
tank is about 30 l only and use shower sparingly If full pump may start
intermittently
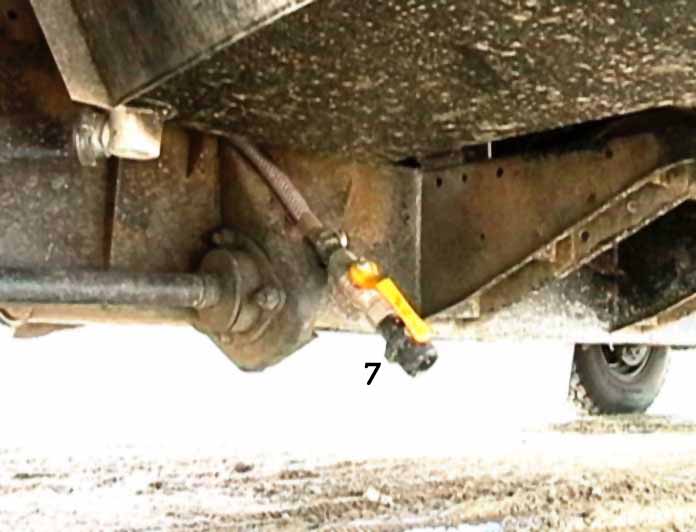
- gray water tank
can be
emptied in suitable places (roadside)
- valve [7] (RS
under vehicle)
must be closed
- when driving
[failure to do so is apparently costly and most certainly
embarrassing]
- in C/Pk /
camping ground [common
courtesy]
- water tank (80
l) can
be filled up using hose located most likely in outside compartment
on LS
- hose is likely
to be connected
to itself to avoid dripping in compartment,
- get connecting
fittings from
the box in the same area
- disconnect hose
and connect
fitting
- screw hose on
water outlet
- open filler
behind cabin - RS
- fill until
water overflows
- do not forget
to remove screw-on
part from water outlet when finished
- drink water
quality hose (white) is to be used
|
 |
12V DC power management:
- all appliances in
living section
are driven from auxiliary 12V system (deep cycling battery under RS
seat)
- roof lights
- reading spotlights
- night LED light
- fridge (the most
power hungry one!)
- various sockets
- diesel heater
- operational power
for gas water
heater
- operational power
for toilet
flushing
- auxiliary 12V
system is supplied
from two possible resources
- 240V
converter/charger
under RS seat
- if auxiliary
battery is flat,
starting battery is not affected, starting battery cannot be flattened
from
camper section appliances
- the voltage of house battery
is on small meter in 12V control area
|
|
Gas bottles:
- open sided 19 size
wrench is
needed to replace gas bottles
- suitable shifter
is stored in
gas bottle compartment or beside driver's seat
- Note: gas
thread is left
handed ( see notches on the nut ) and it works in the opposite
direction
to all common threads !!
|
|
Stove:
- to ignite burner
- get lighter from
the drawer
- turn desired knob
and press
down
- light burner
- keep knob pressed
for a few
seconds
- there is a
safety temp sensor
behind each burner which has to be heated
|
|
Microwave:
is gone - holding screws
did not survive corrugations at National Parks in WA and we decided
that the space can be used better anyway...
|
|
Hot water:
- pump [5] must be ON
- there have to be
enough fresh
water in tank (use monitor [6])
- flip heater switch
[3]
- after it is
switched on red
light came on for a few seconds and it is normally possible to hear gas
burner
- it takes at least
20 min to
get hot water if outside temperature is around 15 deg
- heater is
thermostat controlled
- heater is to be
switched off
when traveling
- heater is to be
switched off
before driving in petrol station
- Note [4] is LED
night light switch
|
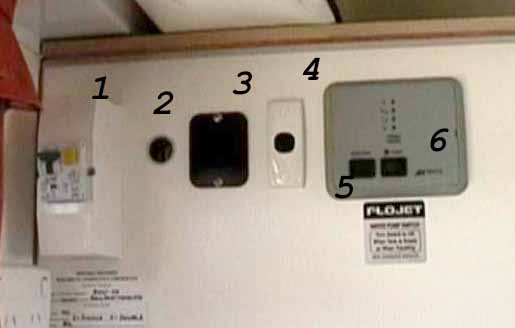 |
Table & bed exercises:
- Table to double
bed
- loosen all three
star knobs
- lift the table
and remove middle
section of the leg
- put middle
section of the leg
aside for future use
- carefully deposit
table between
both seats
- insert end
fillings both sides
- rearrange
cushions to form the
bed
- Double Bed to
table
- put middle
section of the leg
on the bottom section
- carefully deposit
table on the
leg
- reposition table
to desired
position
- tighten all three
star knobs
- rearrange
cushions to form backrests
- Overhead Bed
- single adult bed
- it was never used
so far - we tend to use this area for storage
- it is possible to
remove the central sectopn of the Overhead Bed to create bigger living
area.
|
|
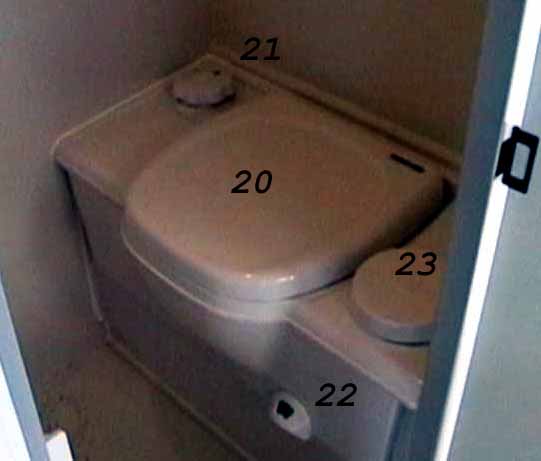
CC tricks
- Usage
- before use
- open seat valve
by
turning knob
[21] CCW
- open lid [20]
and
use as usual
- in this order, if there
is slight pressure in tank it can blow some mist in your face
- after use
- push knob [21]
down to flush
(sparingly, if possible)
- do not
attempt
to close seat
valve until completely empty
- if electric
flushing does not
work, check if there is enough flushing water and refill
- shower can be
used to flush
if [21] operated flushing is not working (take care not to overdo it...)
- wait a few
seconds to drain
water
- close seat
valve
by turning
knob [21] CW
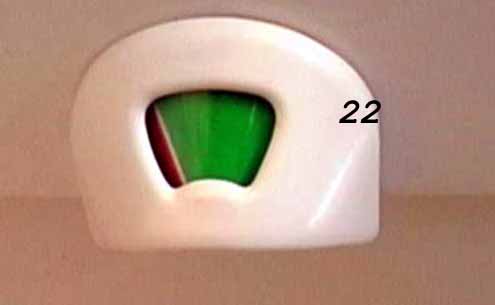
- check dial [22]
if still deep
in green or look inside before closing
- warning:
as soon as dial
starts to move to the right, it is time to empty the tank. Manufacturer
claims
that the whole scale of this gauge is the last 1/4 of tank but
experience shows, that
it
may be even less (or it never goes fully to the right).
Misjudging of this may cause a serious mess...
- compartment [23]
is for toilet
paper but it is useless unless you like the soggy variety
- To empty (read
the
manual...?)
- prepare action
- find out where
to dump "black
water" or "cartridge toilet tank" (ask at Park Office)
- investigate the
place, plan
your action and how you will wash your hands
- unlock CC
compartment and open
- get rubber
gloves from outside
compartment on LS if required
- make sure, that
bowl valve is
fully closed by turning knob [21] CW , if
you try to move cartridge while the bowl valve is open the system will
be broken
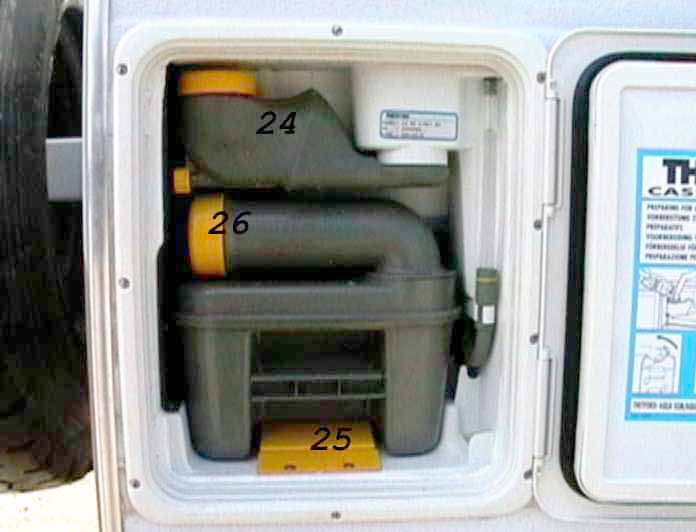
- remove tank [26]
(it is 20 l
so it is unlikely to be very heavy)
- push the flap
[25] on the bottom
of compartment
- pull by handle
(there is a stop
before it falls out)
- grab second
handle and remove
by lowering outside handle
- carry away
using top handle
(where swing outlet is located)
- at dumping site
- turn swing
outlet [26] ~180deg
- undo cap
- start pouring
- as soon as it
is inclined, push
air valve button on the other end
- even with air
valve open there
is a tendency for some splashing - pour carefully
- if dump place
is hole in ground
, push outlet a bit inside (the best option)
- when empty,
close cap and take
to place, where tank chemical will be added
- recharging of
liquids
- replacement
liquids and rubber
gloves are in gas bottles compartment
- tank chemicals -
after emptying
- add thorough
emptying outlet
[26], never thorough the bowl
- add ~100 ml of
chemical (or read what is on the bottle)
- add ~ 2 l of
water
- close
- insert (push)
tank back in compartment
- flush chemicals -
when you run
out of flushing liquid or if low in supply tank (there is a level gauge
in the compartment)
- swing open
small filler [24]
above tank
- undo the cap
- pour in 100 ml
of flushing liquid
- add water until
overflows
- close cap and
swing close
- enjoy holidays
again...
- emergency
emptying if overfilled
- do not try to
remove tank or
close seat valve inside
- get some bucket
- swing emptying
outlet out of
vehicle
- undo its cap and
let partly
drain contents into bucket
- close the cap
- empty the rest
normal way
|
 |
| Insurance information:
|

Petr and Marie Baum
Membership No V 23791
|