RADIO PROCEDURES
Vessel Name: MASQUERADE Vessel Call Sign: …………
ABC / Whitsunday Rent-A-Yacht monitors VHF Channel 81 & 82 from 0800 to 1700 7 days.
All Island Resorts monitor VHF Channel 16 and are only contactable line of sight.
ABC / Whitsunday Rent-A-Yacht has two regular daily radio schedules,
at 0800 and 1600 on VHF Channel 66/86
Turn to Channel 86 and await the call from ABC /Whitsunday Rent-A-Yacht.
To call ABC / WRAY at other than sched time turn the radio to Channel 81,
check squelch, volume and ensure the set is on INT not USA
Call: “ABC ABC this is MASQUERADE, MASQUERADE on 81 over.”
If no answer repeat, if no answer after 2nd call, wait 5 minutes then call again. Radio reception in the Butterfly bay, Blue Pearl and Stonehaven area can be erratic on Channel 81, try Ch82 Between 0800 & 1700.
ABC/WRAY after hours contact is Airlie COMSTAT via CH81 or CH82 or 4946 5206.
SEAPHONE
Your vessel is equipped with Telstra Seaphone facility allowing normal telephone connection to be made to any other telephone. The cost is similar to the normal interstate telephone rates in Australia for connection to any telephone in Australia or New Zealand (approx $4.50 connect fee + $1.55 per min). International rates extra.
The procedure is simply to turn to a SEAPHONE Channel (25, 28, 83 or 66/86) call “Telstra Sea Phone, Telstra Sea Phone, Telstra Sea Phone this is the vessel MASQUERADE, MASQUERADE”
An operator will come on and make any connection required.
WEATHER FORECASTS
The Whitsunday area weather forecasts are encompassed in the Bowen to St Lawrence region and
are transmitted by Airlie COMSTAT on 81, 82 then 22 at 0803, 1203 & 1603 daily.
All charter bases broadcast the weather preceding their sched.
Telstra Seaphone broadcasts a full Queensland coastal forecast on channel 66/86 at 0633 and 1633 daily.
EMERGENCY RADIO PROCEDURE CHANNEL 81
and/or
AFTER HOURS ASSISTANCE
Before calling ask yourself “can these query or problem wait until 0800”. If not use the following procedure:
“PAN PAN, PAN PAN, - this is the vessel MASQUERADE, MASQUERADE ”
I am located at ………………………….. with ………. People aboard”
Then state the nature of the emergency.
“MAYDAY” should only be used when there is immediate danger to life and limb.
If no response on channel 81 call again on CH16 and if no response call Townsville Radio on CH 28 or 66/86.
LOCATION OF EMERGENCY EQUIPMENT
FIRE
EXTINGUISHERS.
One – In saloon – port side
Two – in locker starboard aft cabin
Three – in locker port aft cabin
LIFE JACKETS in corridor locker – port side forward
FIRST AID KITS in galley locker
FLARES, V SHEET Starboard cockpit locker with life jackets
TOOLS/SPARES in corridor locker – port side aft
SPARE FAN BELTS in corridor locker – port side aft
EMERGENCY TILLER Port stairs aft locker
SPARE ANCHOR in forward deck locker
SPARE WATER NA
LIFEBUOY On aft pushpit rail.
FUEL CUTOFF Under cabin floor midships port and starboard
BILGES PUMPS, SEACOCKS AND BUNGS.
The following pumps are provided on this vessel for pumping the bilge’s.
Electric pumps– located in each of the ten bilges.
The electric bilge pump operates automatically when the water in the bilge reaches a certain level and a float switch becomes operational.
The seacocks are associated with; the galley sink, toilet (salt water in and effluent out), handbasin and engine cooling and are the most common cause of water in the boat. The vessel is provided with bungs to block the hole if a seacock should be leaking and inoperative they are located in the safety canister.
ENGINE. Type 2 x Yanmar 47 hp Fuel Endurance 120 hours
Given a speed under power of 8 knots… @ 2000 rpm.
START.
Pull gear lever out
Push lever forward about 1/3
Turn ignition key to on – buzzers should sound.
Turn ignition key to start.
Once engine starts and is running at about 1200 rpm Buzzers should stop.
Check water out of exhausts.
Gear lever can be brought back to neutral position –ensure it clicks into neutral ready to be put into gear.
NOTE. When putting engine/s into gear move the gear levers slowly but firmly.
When changing gear always stay in neutral for 5 seconds to allow propeller to stop.
Then engage required gear.
STOP.
Move gear lever back to neutral
Press red stop button
Once engine has stopped buzzers should sound.
Turn key to off.
When ignition switched off buzzers should cease.
***BEFORE MOVING ALWAYS CHECK***
DINGHY IS TIED UP SHORT – AND NO LINES OVER THE SIDE OF THE BOAT.
Water is coming out of exhaust.
You are able to engage gears – forward and reverse.
If leaving a marina always stow away all lines and fenders.
WHILE MOTORING OR MOTOR SAILING.
Occasionally check that water is coming out of exhaust.
Keep an eye on gauges and or warning lights referring to oil pressure, water temperature and battery charging.
If a warning buzzer comes on whilst the engine is running check which light is lit up;
Then STOP the engine.
ALWAYS INVESTIGATE AN ALARM SITUATION IMMEDIATELY
OIL PRESSURE LIGHT
Check the oil level with the dipstick; If no oil registers on the dipstick then call base.
CHARGE LIGHT
The most common cause of a malfunction in the charging circuit is a broken or loose V belt. Re-tension the belt or replace it with a spare from the tool locker. Also check the wires to the alternator and tighten if necessary.
WATER TEMPERATURE LIGHT (High Temp Warning) (and Temperature Gauge.)
Check whether water is flowing from the exhaust.
If there is no water flowing, stop the engine and let it cool down. Call Base.
You may have to change the impeller in the raw water pump – base will advise.
If you have lost water in the header tank on those vessels with fresh water cooling
DO NOT top up a hot header tank with cold water.
There is 1000 litres of DIESEL, the filler is located on deck midships port and starboard.
There is no spare Diesel fuel container.
Extra fuel may be obtained from Shute Harbour, Hamilton Island or Abel Point Marinas.
NO EXTRA OUTBOARD PETROL IS TO BE CARRIED ON ANY VESSEL.
Power on this vessel is supplied by a number of batteries as follows:-
No 1. Main under saloon seat ……….…………………………………400 amp hours
No 2. Standby under saloon seat ………………………………………300 amp hours
The batteries are switched on by rotating the Main Battery Switch, leave on unless instructed.
This vessel is equipped to charge the batteries as follows;_
Port engine alternator via a diode to prevent house load discharging the engine battery.
Starboard engine alternator via a diode to prevent house load discharging the engine battery.
All batteries need to be charged daily by running the engine/s @ 1500 revs. for at least 1 ½ hours in the morning and 1 ½ hours in the evening. About as long as it takes to enter and exit an anchorage.
If a battery has been allowed to run down it may take up to 6 hours to re-charge.
Solar panels located on the bimini. Bear in mind that cloudy days will not be charging the batteries as efficiently as bright sunny days
TAKE CARE not to put towels, clothing etc over the top of the panel/s.
When plugged into shore power or running the onboard genset using the battery charger when fitted.
GENERATOR:. The generator should be used when at sea whenever the air-conditioning, dish washer, DC outlets or microwave are in use (at the same time switch on the battery charger)
Start generator first ensure All 240 volt power switches are off, starting generator on no load and let warm up for 10 minutes before switching on load.
Stop generator – turn 240 main switch off allow to cool on no load then turn off.
This vessels battery charger located under the saloon seat
MAIN SWITCH PANEL is located aft in the saloon.
The refrigeration compartment is located as follows:-
Galley fridge ……………………………………………..Capacity 133 litre
Galley freezer …………………………………….………Capacity 100 litre
Cockpit fridge ………………………………………..…..Capacity 75 litre
The refrigeration unit/s on your vessel are activated by an on/off switch located:-
On the main switch panel.
This vessel has a:-
12 volt ELECTRICAL SYSTEM
Leave the fridge’s on at all times when needed
FOR BEST RESULTS:
Try to have the lid open for the shortest time possible.
Keep frozen goods against the element.
Do NOT put anything hot into the fridge and load `warm’ drinks a few at a time.
Check, and if necessary, rotate your food daily.
FRESH WATER
This vessel has water tanks located as follows:-
1. Starboard tank ……………………….………….. capacity 400 litres.
2. Port tank……………….………………………… capacity 400 litres
3. In hot water tank ………………………………… capacity 45 litres
Total capacity 845 litres
You are be advised to use the tanks individually. The pump selection is by selecting the pump on the main panel. Under the saloon seat next to the battery charger are two normally open valves.
To obtain water pressure from the port tank, turn the port fresh water switch on, on the main panel.
To obtain water pressure from the starboard tank, turn the starboard fresh water switch on, on the main panel.
A pressure switch on the pump will activate whenever a tap is turned on. Always turn the main panel switch to ‘off’ when water is not required especially at night.
The fresh water pumps are located port under floor before forward cabin, starboard under the galley floor at bottom of steps.
USE YOUR WATER SPARINGLY!
Rinse crockery in salt water.
Rinse and wash vegetables in salt water.
When showering wet yourself quickly – turn shower off – shampoo and soap up – rinse off quickly.
Use a glass of water when cleaning your teeth.
Fresh water fills may be obtained at Shute Harbour, Hamilton and Abel Point Marinas. Hayman Island Marina may allow you to take on fresh water but permission must be obtained from the Marina Office (Channel 16) prior to entering. The cost is approx $30.
HOT WATER.
Your vessel is equipped to provide hot water in the following manner.
HEAT EXCHANGE from the both engines cooling water through a holding tank.
If your hot water starts to cool off due to cold water being introduced into the holding tank the engine will have to be run for a while to heat the water again.
ELECTRIC heater installed in the holding tank for use when attached to shore power. DO NOT USE
PLEASE NOTE:
When the showers are being used the wastewater will be pumped away immediately to prevent smells. The shower drain switch on the main panel must be left on to activate this.
Your vessel is equipped with a four burner stove, grill and oven. Typically the 4 kg bottle will last 4 weeks.
To operate: -
Turn the gas on at the bottle located in the forward deck locker.
Turn ‘on’ gas valve located in the locker to left of stove.
Push and turn control knob –light and hold in place until Fail Safe device activates.
NEVER USE GRILL WITH OVEN DOOR IN CLOSED POSITION
When cooking is finished turn off gas at the bottle – particularly before retiring for the night.
NOTE. FOR YOUR SAFETY EVERY BURNER IS FITTED WITH A ‘FAILSAFE’ DEVICE. THIS MEANS IF THE FLAME GOES OUT DURING OPERATION THE ‘FAILSAFE’ DEVICE WILL AUTOMATICALLY TURN OFF THE SUPPLY OF GAS.
WHEN LIGHTING, IF THE BURNER GOES OUT AFTER RELEASING THE CONTROL KNOB, IT USUALLY MEANS THAT THE KNOB HAS NOT BEEN HELD IN LONG ENOUGH OR A HIGHER FLAME IS REQUIRED TO GENERATE SUFFICIENT HEAT FOR THE `FAILSAFE’ DEVICE TO FUNCTION CORRECTLY.
CLEANING AND MAINTENANCE.
DO NOT WASH ANY PARTS WHEN STILL HOT.
Your appliance needs an occasional wash in warm soapy water
Food spots, which may dry hard, are best removed after the appliance has cooled to warm – if left longer they become baked on and harder to remove.
Do NOT use abrasive cleaners on any part of the appliance.
Do NOT operate without burners being in position, or when wet due to spills or cleaning.
Always ensure there is adequate ventilation.
To operate turn on the gas at the bottle then the valve on the gas line to the BBQ.
Your BBQ has a adjustable control push in and turn it to the `high’ setting. Light the burner either through a hole in the front of the BBQ or by lifting the cooking plate inside.
When finished close all valves and clean off the cooking tray with tissue whilst any fat is still warm.
A stainless steel scourer is provided to assist you keep the BBQ clean.
MARINE TOILET
The marine toilet (or head) is a simple piece of equipment, which seldom gives trouble if not abused.
NEVER put anything insoluble or large wads of toilet paper into the bowl as it easily becomes clogged.
A charge, plus any travelling costs will be made for a service call for a blocked toilet.
INSTRUCTIONS.
PARR / JABSCO TYPE
Move the wet/dry bowl selector to the wet bowl position and pump handle up/down a few times to add some water to the bowl PRIOR TO USE.
After using, flush by again pumping handle up/down (in wet bowl position) until bowl is thoroughly rinsed and evacuated.
Move wet/dry bowl selector to the dry bowl position and continue pumping until only about one cup of water remains in the bottom of the bowl.
Leave the wet/dry bowl selector in the Dry Bowl Position when toilet not in use.
If the lever is left in the open position water may flow in and flood the boat!!!!!
A marine toilet MUST be pumped for 20 seconds to avoid build up in the pipes.
NOTHING down the toilet that has not been consumed (except toilet paper used sparingly)
A few drops of cooking oil poured into the bowl daily will ensure smooth operation.
STARTING THE ENGINE - tiller handle models (Mercury 6hp).
Open fuel tank vent on manual venting type tanks.
Squeeze the fuel line primer bulb several times until it feels firm.
Mercury -Set the throttles grip to neutral position.
Johnson - Ensure gear lever is in neutral position.
Mercury - Wind primer/idle speed knob clockwise to give fast idle.
Johnson - Set throttle grip (fast/slow) to start position (half) throttle.
When engine is cold;
Mercury - pull out and push in the primer/idle speed knob once or twice to prime the engine ensuring that the knob is left in the in position before starting the engine
Johnson - pull choke button out to prime engine push in after starting.
Pull the starter rope slowly until you feel the starter engage, then pull rapidly to crank the engine. Allow rope to return slowly. Repeat until engine starts.
NOTE: Starting flooded engine;
Johnson - Turn throttle back to “slow”.
Continue to crank the engine for starting or tilt motor up for ½ hour and try again.
7. Mercury - Turn the primer/idle speed knob counterclockwise (direction of arrow) to obtain desired idle speed as engine warms up.
Check for a steady stream of water flowing out of the water pump indicator hole.
Gear selector must be in neutral or forward gear to TILT motor.
Lock motor in “Tilt Up” position when towing in rough conditions.
Mercury - Knob is located on starboard side near tilt mechanism.
Johnson - on starboard side of motor, move white lever forward to lock in.
***IMPORTANT***
DO NOT OVER INFLATE A NIAID DINGHY - IT SHOULD HAVE 2 POUNDS OF PRESSURE WHEN HOT. OVER INFLATION WILL SPLIT THE SEAMS AND INCUR A BOND DEDUCTION.
GEARSHIFTING - TILLER HANDLE MODELS
Your outboard has three gear shift positions to provide operation: Forward (F), Neutral (out of gear) and Reverse (R).
IMPORTANT: Do not attempt to shift outboard into Reverse gear when the engine is not running. This could cause damage to the gear shift mechanism.
Always shift outboard with a quick motion.
After shifting outboard into gear, advance the throttle increase speed.
STOPPING ENGINE - tiller handle models.
Reduce engine speed and shift outboard to neutral position. Push in the engine stop button or switch off on side of engine.
Stop the engine. Shift the outboard to neutral or forward gear position. Take hold of the top cowl grip and raise outboard to full tilt up position lower until one click then raise carefully until it just clicks again.
Raise outboard to “tilt up” position and gently lower it to release tilt mechanism.
This outboard has three shallow water drive positions to allow you to tilt the outboard up to prevent hitting bottom.
IMPORTANT:
Operate outboard at slow speed for shallow water operation and keep the water intake submerged.
To release down to run position, stop engine and tilt outboard up to one of the tilt release positions and gently lower it down.
NEVER hit underwater objects with the motor in gear as this may shear the propeller off the shaft.
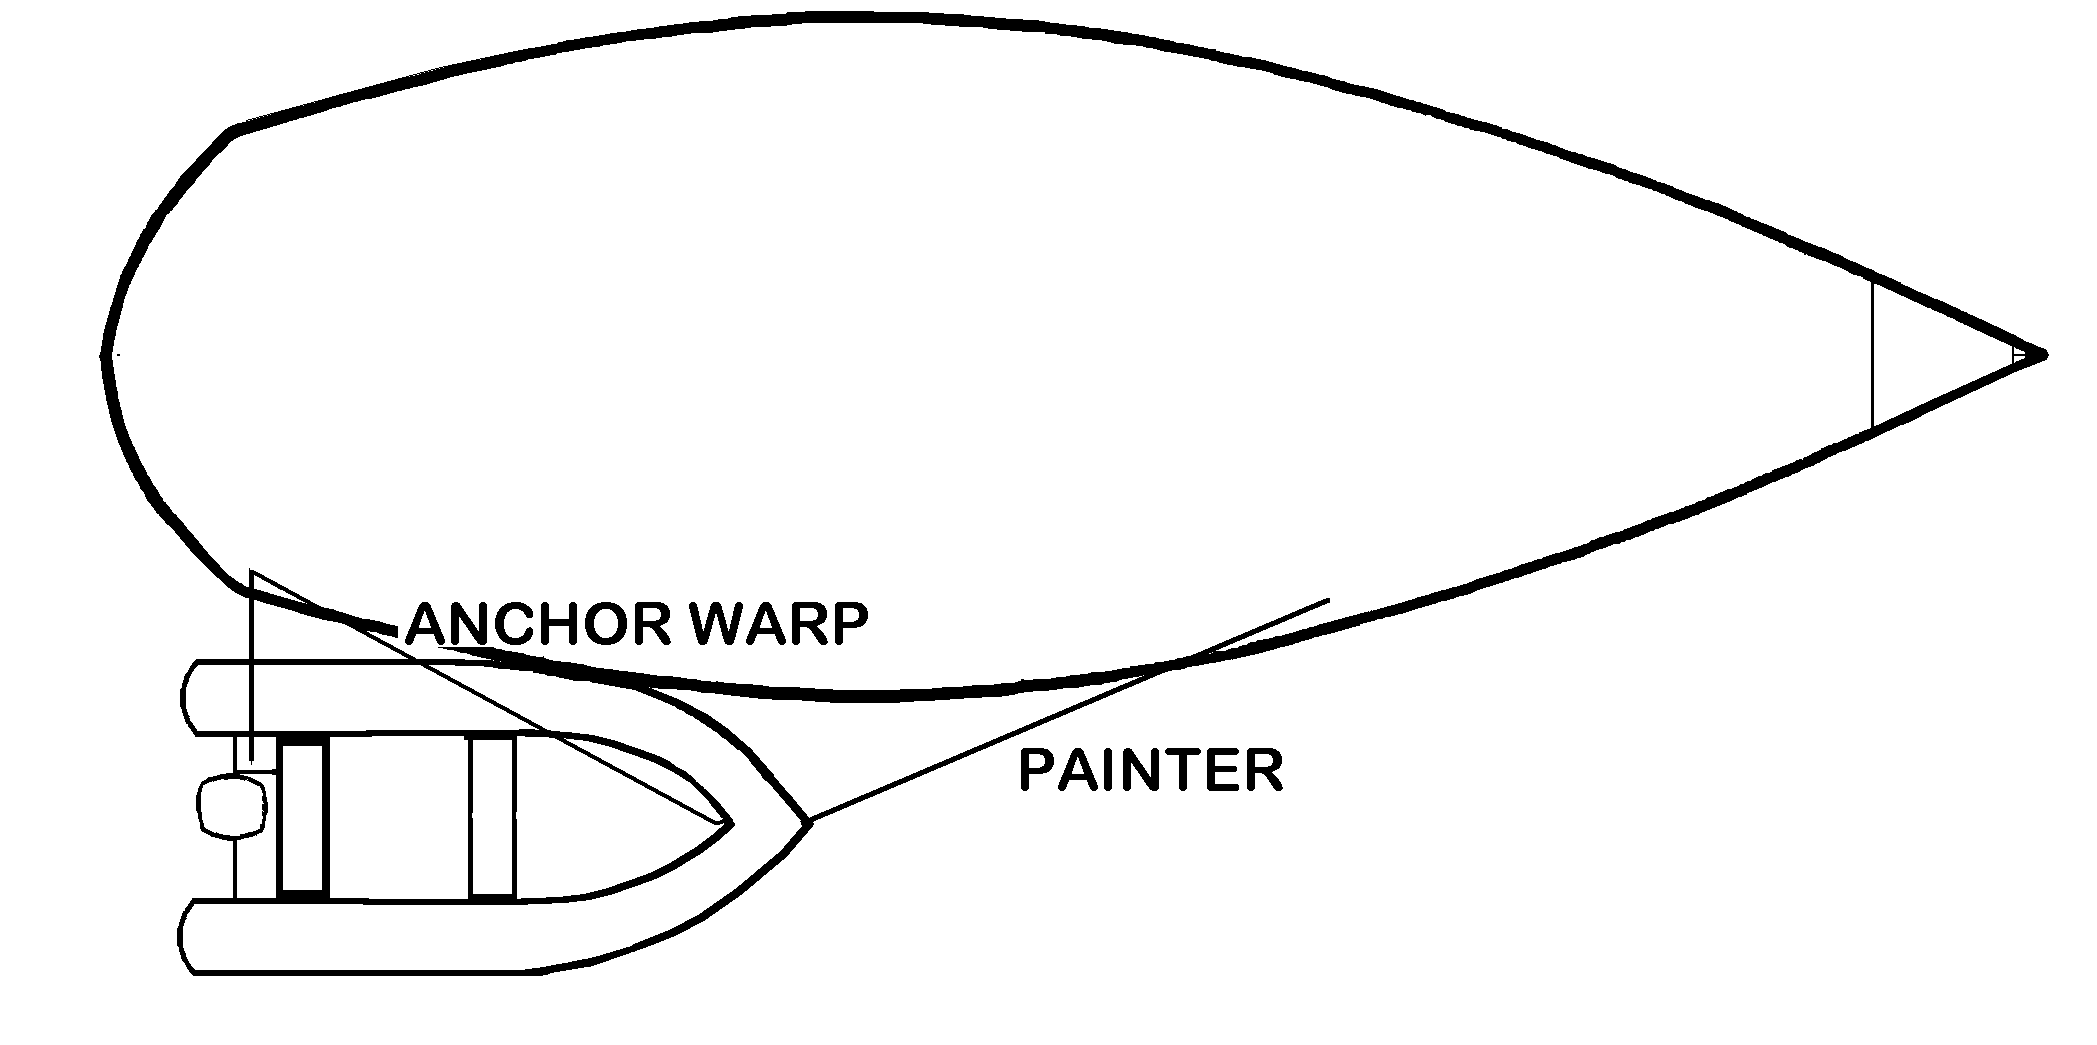
USE OF DINGHY AS AN AUXILIARY ENGINE
In an emergency, the dinghy can be used as an auxiliary engine to relocate to the nearest anchorage.
Tie the dinghy painter (towing rope) to the forward mooring cleat or rigging chain plate so that the dinghy is alongside the cockpit, transom to transom.
Tie the dinghy anchor warp around the aft cleat in the boat and secure fairly tightly.
Tie a mooring line around the aft seat or to the aft mooring cleat.
One person can now control the outboard engine and the boat is steered with the wheel.
The reef appears suddenly from deep water and may have isolated coral heads (bombies) away from the main reef line. The usual colour from above the water is yellow/brown and reef is best seen with the aid of Polaroid sunglasses and at low tide.
The reef may be hard to see due to the sun’s reflection. If you are looking into the sun, go out again and approach from a different direction. From 3.30 to 4.00pm the reef areas are difficult to see then the sun becomes too low to reflect the difference in colour between shallow and deep water.
You may leave the anchorage any time after you are confident you can see the reef. This will not normally be before 7.00am. You MUST be anchored by 4.00pm so that you have time to move to another anchorage if we consider your position, as reported on the 4.00pm schedule, is not a suitable anchorage. You have the best chance of seeing the reef while anchoring and we can get to you in daylight should you need help.
A CQR plough anchor and 70 metres of chain is carried with the windlass in the anchor locker.
Pull dinghy up short or alongside to ensure painter cannot be sucked into propeller.
Approach slowly under power with the sails furled and the anchors ready to drop.
Consult the 100 Magical Miles for the actual position for anchoring.
With a crewmember stationed to watch for coral, approach into the current or wind.
Stop boat by reversing motor. Drop the anchor under control, with enough chain to leave the anchor on the bottom. A slackening of the chain indicates this.
As the yacht drifts away, feed out the chain as fast as the yacht moves off.
When sufficient chain is out, lock off winch. Put the motor astern slowly for a few seconds only and dig the anchor in. When the yacht stops moving, put the motor in neutral. The yacht should now go ahead slightly as the pressure on the chain is released. ONLY WHEN THE YACHT HAS STOPPED should the motor be turned off. Once you are satisfied the anchor is dug in, attach snubber by putting hook through a link. Let small amount of chain out until snubber takes all the weight.
ANCHORING - MINIMUM LENGTH OF CHAIN
Your vessel has 70m of chain. It is marked every 10 metres. As a general rule, you will need to put out a minimum of 3 times the total depth at high water plus 10 metres for safety.
Assume you anchor on a low tide in this example.
High water (from the tide tables) 4.2 metres
Low water (from the tide tables) - 0.2 metres
Maximum tidal range for the day 4.0 metres
Depth at time of anchoring (lead line) + 6.0 metres
Total depth at high water 10.0 metres
Chain required (3 x 10) 30.0 metres
Add approx. 10 metres as a safety measure +10.0 metres
TOTAL CHAIN 40.0 metres
Your yacht will normally lie to current or wind. As the current changes at slack water or as the wind strength reduces, the yacht may wander before settling in a new direction. You MUST have sufficient room and depth to swing in ANY direction the full length of the chain and warp without ever being over reef or shallow water. You must also allow enough room between yachts to swing full length in opposing directions.
CAUTION: Whenever you start the motor, or put the yacht astern, check first to ensure all fishing lines are inboard and the painter is clear of the propeller.
Start Engine. Motor gently forward until anchor chain is vertical. Use foot switch to pull in until you can undo the hook (snubber) then keep chain vertical by moving forward slowly as chain comes on board. Ensure chain does not pile too high blocking Hawser pipe and jamb windlass. You need to clear it as you go. Once anchor is clear of water, lift it onto bow roller by hand to prevent damage to bow and secure by hooking the snubber and tying short.
NOTE: A circuit breaker to prevent overloading the windlass motor is located on the port side of the saloon seat. To reset windlass motor switch to on.
SAILS
The jib has roller-furling system and can be adjusted to any size required for the wind conditions.
You may have to adjust the headsail sheet cars to give optimum performance.
The furling line is on the port side of the cockpit and must be eased off as the sail is pulled out on the working sheet. Tie the furling line off on the cleat before tensioning the sheet.
To furl the jib, pull on the furling line and ease the tension on the working sheet so that the sail rolls neatly round the forestay, ensure all the sail is covered with the blue UV protection strip..
The mainsail is a conventional sail, which is left attached to the mast and boom at all times. It has a single line slab or jiffy reefing system with Lazyjack Jackpac system to simplify gathering the lowered sail.
HOISTING THE MAINSAIL
1. Unzip sail cover
2. Attach the halyard to the headboard.
3. Ease the boom vang.
4. Uncleat the mainsheet.
5. Bring the boat head to wind.
6. Hoist the main by hand watching the battens do not get caught on the lazyjacks.
7. Tension the luff using the winch on the starboard side of the companionway. Close the clutch cleat.
8. You may need to ease the topping lift, but remember to retighten before you drop the mainsail.
9. Bear off to fill the sail.
10. Tidy all lines.
REEFING THE MAINSAIL
Your vessel needs one reef when the wind strength is about 15 knots and a second reef when the wind is stronger than 20 knots. It is advisable to reef before leaving your anchorage or mooring, but if you find it necessary to reef while underway, follow the procedure below:
1. Furl the headsail.
2. Shorten the dinghy painter.
3. Start the engine.
4. Hold the boat head to wind.
5. Tension the topping lift.
6. Ease the main halyard and pull reefing 1 (port side) as required.
7. Close the clutch cleat.
8. Tighten the main halyard.
9. Ease the topping lift.
10. Bear off to fill the sail and tidy all lines.
11. Stop the engine and let the dinghy out.
For the second reef, repeat the procedure given above with reefing 2 (starboard
side). Adjust the headsail size to balance the mainsail.